Achieve Node.js Server with JavaScript Servlets
Achieve is a modern HTTP server that runs on Node.js and uses JavaScript Servlets to initiate back end processing.[1] (npm, github) JS Servlets are fast, very easy to use, and do not limit your ability to develop sophisticated back end applications; perfect for rapid development of microservices or complete Node.js based web applications.
Some Servlet features: The servlet container handles text responses. You simply send a result back using a return statement in the servlet. When you change your back end programs, they are automatically reloaded. No need to restart the server every time you make a change. If there is an error in your application code, you receive a very informative error message - without crashing the server. When using XHR, error messages can be displayed in the browser's inspector-console just as errors in browser code do.
You can also take control of the response via the Servlet Context to, for example, set headers and return blobs.
Achieve is easy to install and run. No dependencies. Requires Node.js v8.1 or later. (Developed / tested with v8.9.4)
From beginners:
- You do not need to know anything about Node.js.
- You can Achieve as you are learning JavaScript.
- You can write back end apps without knowing HTML or CSS.
- Recommended for use in early web development training.
- Recommended for use while learning JavaScript.
- Recommended for early training in other web related technologies such as database.
To advanced users:
- Excellent development features.
- Fast enough for production.
- Take control through use of the Servlet Context.
- Apply advanced JavaScript and Node.js knowledge.
- Use other Node.js modules in your applications.
Regular HTTP features:
- Delivers static content.
- Unlimited MIME support.
- Runs back-end JavaScript programs (via JavaScript Servlets).
- Supports defaults index.html, index.htm, index.js
- Supports browser caching. (ETag)
- Supports compression with ss caching. (gzip,deflate)
Special Features:
- No knowledge of Node.js required to start using JS Servlets.
- Little knowledge of JavaScript required to start using JS Servlets.
- Servlets handle HTTP Response. App just uses return statement.
- Useful app error reports can be displayed in browser console.
- Automatic reload of modified files.
- Servlet Context Object allows developer to take complete control.
- Node.js environment configuration. (development,production)
- Configurable apps folder path and path to the ROOT application.
Quick Start Tutorial
Running Achieve (simplest form):
const server = require('achieve');
server.setAppPath(__dirname);   // Sets the application directory to wherever this program is saved.
server.listen();  // defaults to port 80 .. change it to something else if you wish
If you need to use a port other than 80, include the port number as an argument to the listen() method. (exp: server.listen(8989);)
Open a command window (cmd) and cd into your application directory. On the command line, type the following:
npm install achieve
At the end of npm's actions and commentaries, you should get something like this:
    +achieve@1.0.5
    added 1 package in 7.281s
In your console, change directory (cd) so that you are in the directory where your server.js (code above) is saved.
Start the server:
Type "node server1" (assuming you named the file server1.js).
You should get a response:
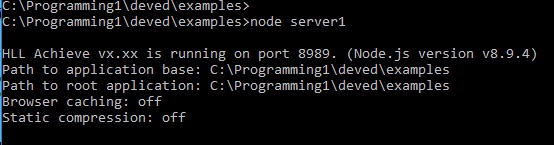
You are ready to serve static content. (html, css, javascript for browser) We will do that in a minute. Let's start instead with a simple example of a JavaScript Servlet.
Hello World Servlet:
// Save this code in file index.js in the apps directory ("application base" - directory where you are running the server)

exports.servlet = function (context)  {
  return "Hello World!";  // Achieve handles the response.
}
In your browser's address bar, enter http://localhost:8989 (assuming port 8989). The text "Hello World!" should appear. Now, without restarting the server; change the text in your servlet to, for example; "Hello There World!" Refresh the page. Achieve will detect a change and reload the file. Servlet caching works pretty much the same way browser caching works. The cached version will be used as long as the file hasn't been changed.
When the file name is not given in the URL, Achieve searches for index.html, index.htm, and index.js; in that order. If it uses index.js, it will run the servlet on the server and return the result. You can achieve the same result by giving the name of any JavaScript Servlet file without the .js extension. In this case: http://localhost:8989/index Including the .js extension corresponds to a browser's request for a resource. http://localhost:8989/index.js will serve the file instead of running it.
Achieve will also return helpful error messages to your browser's console. First, let's receive an error message to
the page. Modify your servlet to cause an error by deleting a few characters from the end of the return statement:
return "Hello World. Refresh the page.
To see how to receive error message in the browser's console, save this
HTML file and save it to your apps directory as index.htm. Open the inspector in your browser and click on the console tab. Then
reload http://localhost:8989 On the browser side, the trick is in the callback() function. If the response status is not 200:
console.error(this.responseText); This is a feature
supported by Achieve. Note also that the URL specified in function runServlet() is "index", without the .js extension.
Access parameter values that were sent with the request:
    var myParm = context.parms.myParm;  // or
    var myParm = context.parms['myParm'];
Running Achieve with options:
const server = require('achieve');

server.setAppPath("c:/myachieve/myapps");                // set root directory for all applications
server.setRootDir('root');                               // set a subdirectory under the root directory for THE ROOT application
server.setCaching(true);                                 // turn browser caching support on
server.setCompress(true);                                // compress static resources
server..showMimeTypes();                                 // Show the current list of supported Mime Types
server.addMimeType("xsl", "application/vnd.ms-excel");   // add an unsupported mime type
server.setNodeEnv("development");                        // set Node environment

server.listen(8989);  // listens on port 8989
Servlets can use other functions:
exports.servlet = function (context)  {
  return hello();
}
function hello ()  {
   return "Hello World!";
}
Servlets can use functions in other files.
// in otherfile.js
exports.hello () {
  Return "Hello World!";
}

// in myservlet.js
exports.servlet = function (context) {
  var other = context.load("otherfile.js");  // Extends servlet features to otherfile; reloads if cache is stale.
  return other.hello();
}
The Servlet Context
You can use the Servlet Context to take control of your back end process. The Servlet Context contains:
  context.request    // The session request object.
  context.response   // The session response object.
  context.parms      // Parameters sent with the request
  context.dirPath    // The current application path on your computer
  context.load       // The JavaScript Servlet load() method (see above)
TO DO List
- Support 3rd party logging modules (developer's choice).
- Test HEAD method.
- Separate the Servlet Container and make it available on its own.
- Netbeans support?
- HTTPS
- CORS support?
Future
- Integrate HLL Websockets.
- Complete and integrate HLL intelligent application framework.
Footnotes
1. There is also a module that provides servlet support only; i.e. without serving static resources: servlets.js is the servlet container that is an integral part of Achieve. It might be your choice if you want to build microservices on Node.js using another server for static content. Achieve is still recommended at least during development, as it allows you to easily use the browser with XHR and integrate later - parhaps using servlets.js instead. Note however that Achieve gets through the "serve or run" question efficiently and it is sufficiently light weight that you might end up sticking with it.